Easy Mary Berry Halloween Cake Recipe 🎃🍰 (Spooky & Delicious)
🍂 The Ultimate Spooky Autumn Centrepiece for British Kitchens
If you are searching for a showstopping centrepiece to celebrate the spooky season, this Mary Berry Halloween cake is an absolute winner! There is nothing quite like a traditional British recipe when you want guaranteed success in the kitchen. Mary Berry’s classic Victoria sandwich serves as the gold standard for British baking, renowned across the UK for its light, fluffy crumb, perfectly balanced sweetness, and foolproof preparation. By dressing up this timeless bake with vibrant autumn colours, rich fillings, and eerie decorations, you get a cake that tastes sensational and looks wonderfully festive on any table spread.
When autumn arrives, bringing crisp cool air, falling leaves, and dark October evenings, there is no finer way to spend an afternoon than pottering about in a warm kitchen. The gentle hum of the oven, the comforting aroma of fresh vanilla sponge baking away, and the excitement of creating spooky designs make seasonal baking a cherished tradition for families across the country. Whether you are hosting a lively Halloween gathering for friends, prepping a sliceable treat for local trick-or-treaters, or simply enjoying a relaxing weekend bake with a warm cup of tea, this recipe promises maximum impact with minimal effort.
What makes this particular recipe so special is its sheer reliability. While modern Halloween cakes often require complicated sculpting, intricate fondant work, or specialist tools, Mary Berry’s approach strips away all the stress. Built on time-tested baking ratios, this recipe relies on simple, accessible ingredients and straightforward techniques that produce a tender, moist sponge every single time.
⭐ Why You Will Love This Mary Berry Halloween Cake
There are countless cake recipes available online, but this Mary Berry Halloween cake stands head and shoulders above the rest for several very practical reasons:
- ✨ Foolproof All-In-One Sponge Method: Built on Mary Berry’s signature method for an effortlessly light, golden, and perfectly level bake without complex multi-stage mixing.
- 🛒 Beginner-Friendly Decorating: Uses simple icing techniques—like chocolate spiderwebs or colourful buttercream swirls—that look impressive without requiring expert cake-decorating skills.
- 💰 Budget-Friendly Ingredients: Everyday staples that you can easily pick up from any British supermarket like Tesco, Sainsbury’s, or Waitrose.
- 👨👩👧👦 Fun Activity for Kids: Decorating the cake with candy eyes, spiderwebs, or Halloween sprinkles makes a brilliant half-term activity for little bakers.
- 🎨 Endlessly Adaptable: You can easily customize the fillings and colours to suit a pumpkin theme, a ghost theme, or a rich chocolate variation.
Check This Recipe Mary Berry Pumpkin Cake Recipe
🥣 Essential Kitchen Tools for Mary Berry Halloween Cake
Before you begin baking your Mary Berry Halloween cake, organizing your tools and ingredients ensures a calm and efficient process. Gather these kitchen essentials:

- 🥘 Two 20cm (8-inch) Loose-Bottom Sandwich Cake Tins: Sturdy metal tins ensure even heat distribution so both cake layers bake uniformly.
- 📜 Baking Parchment Paper: Essential for lining the bases of your tins to guarantee an easy turn-out.
- 🥣 Large Mixing Bowl: A spacious bowl gives you plenty of room to combine your batter cleanly.
- 🥄 Electric Hand Mixer or Stand Mixer: Helps beat the ingredients together quickly and smoothly.
- ⚖️ Digital Kitchen Scales: Precise weights are key to achieving Mary Berry’s exact sponge ratio.
- 🧈 Palette Knife or Offset Spatula: Ideal for spreading jams smoothly and getting a clean finish on your buttercream icing.
- 🧊 Wire Cooling Rack: Allows air to circulate around the baked sponges so they cool quickly without getting damp underneath.
- 🧁 Piping Bag and Fine Round Nozzle: Perfect for piping dark chocolate spiderweb rings or detailed icing flourishes.
🥚 Ingredients for Mary Berry Halloween Cake
Here is everything you need to create a double-layer, 8-inch Halloween sponge cake serving 10 to 12 people.

For the Classic Sponge Layers:
- 🍚 225g Self-Raising Flour: Sifted to keep the sponge texture light and airy.
- 🍬 225g Caster Sugar: Fine sugar dissolves quickly into the butter and eggs for a fine crumb.
- 🧈 225g Unsalted Butter: Softened at room temperature so it blends easily.
- 🥚 4 Large Eggs: At room temperature to prevent the batter from curdling during mixing.
- 🥄 2 tsp Baking Powder: Provides that extra lift needed for a lofty, impressive height.
- 🧪 1 tsp Pure Vanilla Extract: Gives the sponge a delicate, warm vanilla aroma.
- 🥛 1-2 tbsp Milk: Added if necessary to adjust the batter to a soft dropping consistency.
For the Spooky Buttercream & Fillings:
- 🧈 200g Unsalted Butter: Softened to allow for easy, silky whipping.
- 🍚 400g Icing Sugar: Sifted to ensure a smooth, lump-free frosting.
- 🧪 1 tsp Pure Vanilla Extract: Infuses the icing with rich flavour.
- 🥛 2 tbsp Milk: Softens the buttercream to make it easy to spread and pipe.
- 🍓 4 tbsp Strawberry or Raspberry Jam: Creates a vibrant “bloody” jammy center layer.
- 🎨 Gel Food Colouring: Bright orange, deep purple, or slime green for festive impact.
- 🍫 50g Dark Chocolate: Melted for piping intricate spiderweb patterns or spooky accents.
👩🍳 Step-by-Step Guide to Baking the Mary Berry Halloween Cake
Follow these clear, step-by-step instructions to create a delicious and visually stunning Halloween cake.
+-------------------------------------------------------------------+
| BAKING WORKFLOW OVERVIEW |
| |
| [Prep Tins & Oven] ➔ [All-In-One Mix] ➔ [Bake 20-25 Mins] |
| │ |
| [Cool Completely] [Whip Buttercream] [Layer Jam & Frost] ◄┘ |
+-------------------------------------------------------------------+
Step 1: Prep Your Oven and Tins 👨🍳
Preheat your oven to 180°C (160°C Fan / Gas Mark 4). Lightly butter two 20cm (8-inch) sandwich tins and line the base of each with a circle of baking parchment paper. Proper preparation prevents the sponges from sticking to the tins.
Step 2: Mix the Sponge Batter (All-In-One Method) 🥣
In true Mary Berry style, place the sifted self-raising flour, caster sugar, softened butter, eggs, baking powder, and vanilla extract all together in your large mixing bowl. Beat using an electric hand mixer for about 1 to 2 minutes until the ingredients combine into a smooth, pale, and creamy batter. Avoid over-mixing once everything is smooth, as over-working the flour develops gluten, which can make the sponge heavy. If the batter feels a little stiff, mix in a tablespoon of milk so it drops easily off a spoon.

Step 3: Bake to Golden Perfection 🍰
Divide the cake batter equally between the two prepared sandwich tins and gently level the surfaces using a spatula. Place both tins side by side on the middle shelf of your preheated oven and bake for 20 to 25 minutes. The cakes are ready when they have risen evenly, turned a golden brown colour, shrink away slightly from the sides of the tins, and spring back when touched lightly in the centre.
Step 4: Cool the Layers Completely 🧊
Remove the tins from the oven and let the sponges sit for 5 minutes. Carefully run a butter knife around the inside edge, then invert the cakes onto a wire cooling rack. Peel off the baking parchment and allow the layers to cool down completely to room temperature before adding any icing.
Important Note: Never apply buttercream or jam to warm sponges! The heat will cause the butter in the icing to break and melt, turning your lovely topping into a runny mess.
Step 5: Whip the Buttercream and Assemble 🍓
While the cake layers cool, make the vanilla buttercream. In a clean bowl, beat the softened butter until smooth and creamy. Gradually add the sifted icing sugar in batches, beating continuously until light and fluffy. Stir in the vanilla extract and a splash of milk. Separate a portion if you wish to tint it with bright orange or purple gel food colouring.
Place one cooled sponge layer on your serving platter or cake stand. Spread a generous layer of strawberry or raspberry jam right across the top, followed by a layer of your coloured buttercream. Carefully place the second sponge layer on top.
Step 6: Spooky Decoration 👻
Cover the top and sides of the assembled cake with the remaining buttercream using a palette knife for a smooth or textured finish.
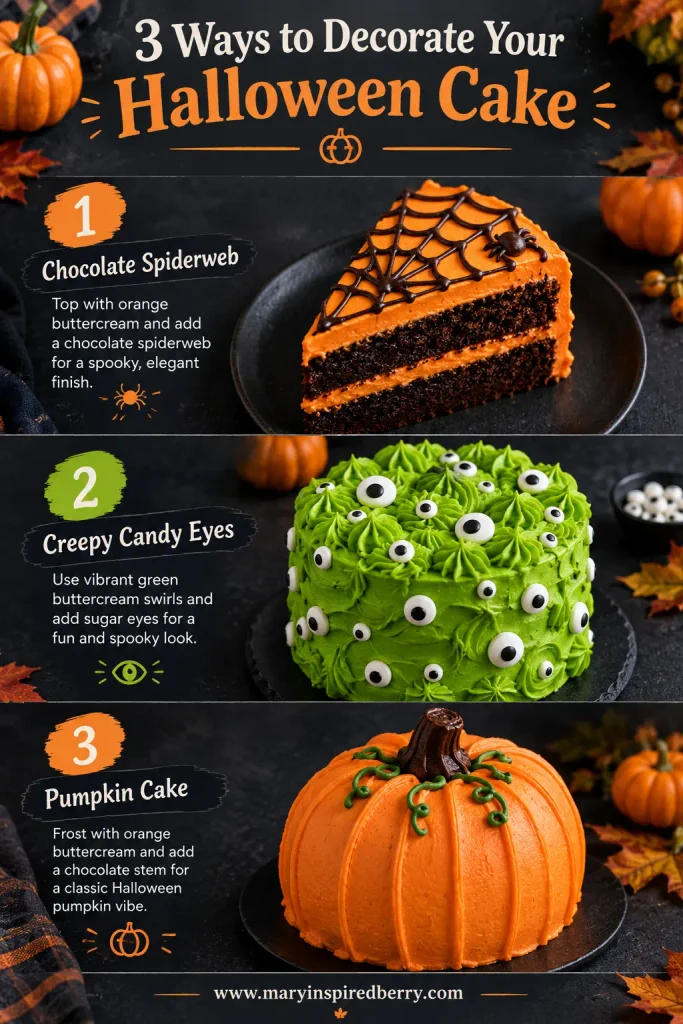
- Spiderweb Design: Melt 50g of dark chocolate and transfer it to a piping bag with a fine round tip. Pipe 3 to 4 concentric circles on top of the cake frosting. Immediately drag a skewer or toothpick from the center circle outward to the edge at equal intervals to pull the chocolate into a dramatic spiderweb pattern.
- Monster Eye Design: Pipe ruffled swirls of bright green or orange buttercream all over the top and sides, then press sugar eye candies of varying sizes into the frosting for a fun, eerie look.

🎨 How to Decorate Your Halloween Cake (3 Spooky Styles)
Decorating your Mary Berry Halloween cake is where you can truly show off your autumn style! Here are three easy, high-impact decorating ideas:
| Theme | How to Pipe & Style | Finishing Touch |
| 🕷️ Classic Spiderweb | Smooth a flat top layer of white or pale orange buttercream. Pipe concentric dark chocolate rings. | Drag a toothpick from the center outward in 8 radial lines to draw a spiderweb pattern. |
| 👀 Spooky Monster | Pipe textured star swirls of bright slime-green or purple buttercream over the entire cake. | Scatter sugar candy eyes of various sizes across the top and sides. |
| 🎃 Pumpkin Patch | Coat the cake in bright orange buttercream, smooth with a palette knife, and score vertical ridges. | Place a green fondant stem on top with chocolate drop accents around the base. |
🤫 Baker’s Secrets for Flawless Cake Results
Even with a simple recipe, a few professional tricks can elevate your home baking from good to brilliant:
- 🌡️ Keep Ingredients at Room Temperature: Cold eggs or cold butter can cause batter to curdle or clump, resulting in an uneven rise. Bring your eggs and butter out of the fridge a few hours before baking.
- 🎨 Use Gel Food Colours: Liquid food dyes add extra moisture to buttercream, making it soft and runny. Concentrated gel or paste dyes yield vibrant Halloween shades without changing the texture.
- 📏 Level Your Layers: If your sponges dome slightly in the oven, use a serrated bread knife to trim them flat before assembling so your layered cake stands straight.
- 🥣 Sift Your Dry Ingredients: Sifting flour and baking powder removes lumps and incorporates air for a lighter crumb.
❓ Frequently Asked Questions
Can I bake this Mary Berry Halloween cake in advance?
Yes! You can bake the sponge layers a day in advance. Once completely cool, wrap them tightly in cling film and keep them at room temperature. Assemble and decorate the cake on the day of your event for optimum freshness.
Can I freeze the cake layers?
Absolutely. Un-iced sponge layers freeze exceptionally well. Wrap each cooled layer in parchment paper and cling film, then freeze for up to 3 months. Thaw at room temperature for a couple of hours before decorating.
How should I store leftover cake?
Store your decorated cake in an airtight cake caddy or container at cool room temperature. Avoid refrigerating the cake unless the room is very warm, as cold air can dry out the sponge crumb. It will remain fresh for up to 3 days.
How do I make a chocolate version of this cake?
To make a chocolate sponge base, simply replace 30g of the self-raising flour with 30g of good quality cocoa powder. Sift the cocoa along with the flour before mixing.

👋 Conclusion: Celebrate with Your Mary Berry Halloween Cake
Baking this classic Mary Berry Halloween cake brings traditional British baking quality to your autumn celebrations. With its light Victoria sandwich sponge base, rich jammy center, and creative Halloween toppings, it is sure to impress family, friends, and trick-or-treaters alike.
Gather your baking tools, turn on your favorite autumn tunes, and enjoy creating delicious memories in the kitchen!